My job requires me to travel every once in a while, this last week and a half is one of those times. I caught a flu and was out of work for a couple days, rested up, and am all set now. This last week, I can across a few great ideas that I want to implement.
First off, I am learning about Netcat this next couple weeks, and will be presenting about my findings at the next newbCON meeting.
Second, I have windows 8 waiting for me at home, as well as my lapdecks for my raspberry pi's.
Third, I found this PirateBox idea and I want to see if i can get it going on a raspberry pi.

Tuesday, October 30, 2012
Tuesday, October 16, 2012
New Cell... S3... Rooted!
Oh- Yea, I bought the Samsung Galaxy S3 on Saturday come home, and rooted it using this easy step by step guide for the Verizon version. And it worked like a charm.
I've got much better battery life, as where my HTC Thunderbolt I had to charge at lunch time to get through the day, I can go from 8 am- 7 pm, without having to connect to a charger.
Since I'm a power user, I bought the extended battery (From qcell) for it from amazon, and it should be here tomorrow.
I decided since my brother called his Blue S3 Shella, I'd call mine GLaDOS. Any time I get an alert, she insults me... and Her Skin from ZAGG is coming soon.
I'll keep you up to date on any new projects I do with her. CM10 coming soon!
Monday, October 15, 2012
Android SSH to Amazon EC2 (for free*)
Continuing down the Amazon EC2 path, we can use the free tier for 1 year, so lets set it up.
From Amazons Pricing page https://aws.amazon.com/ec2/#pricing
Free Tier*
As part of AWS’s Free Usage Tier, new AWS customers can get started with Amazon EC2 for free. Upon sign-up, new AWS customers receive the following EC2 services each month for one year:
- 750 hours of EC2 running Linux/Unix Micro instance usage
- 750 hours of EC2 running Microsoft Windows Server Micro instance usage
- 750 hours of Elastic Load Balancing plus 15 GB data processing
- 30 GB of Amazon EBS Standard volume storage plus 2 million IOs and 1 GB snapshot storage
- 15 GB of bandwidth out aggregated across all AWS services
- 1 GB of Regional Data Transfer
You will need :
30 minutes
A Rooted Android Phone
Internet access
Assuming you have already made a Amazon EC2 account, (if you haven't, follow the instructions on this post)
Login to your EC2 instance.
Select which Region you want it to be in, (on the left hand top side.) Then Launch a new instance.

Use the Classic Wizard, and click continue

Anything with the Stars are part of the free tier,
but click the select on the Ubuntu server 12.04 LTS selection

You don't need to change anything on this page, click continue,

Again, not changing anything on this page (if you do, it might upgrade you to a paid tier not the free one), click continue,

Click continue,

Name Your Instance, click continue

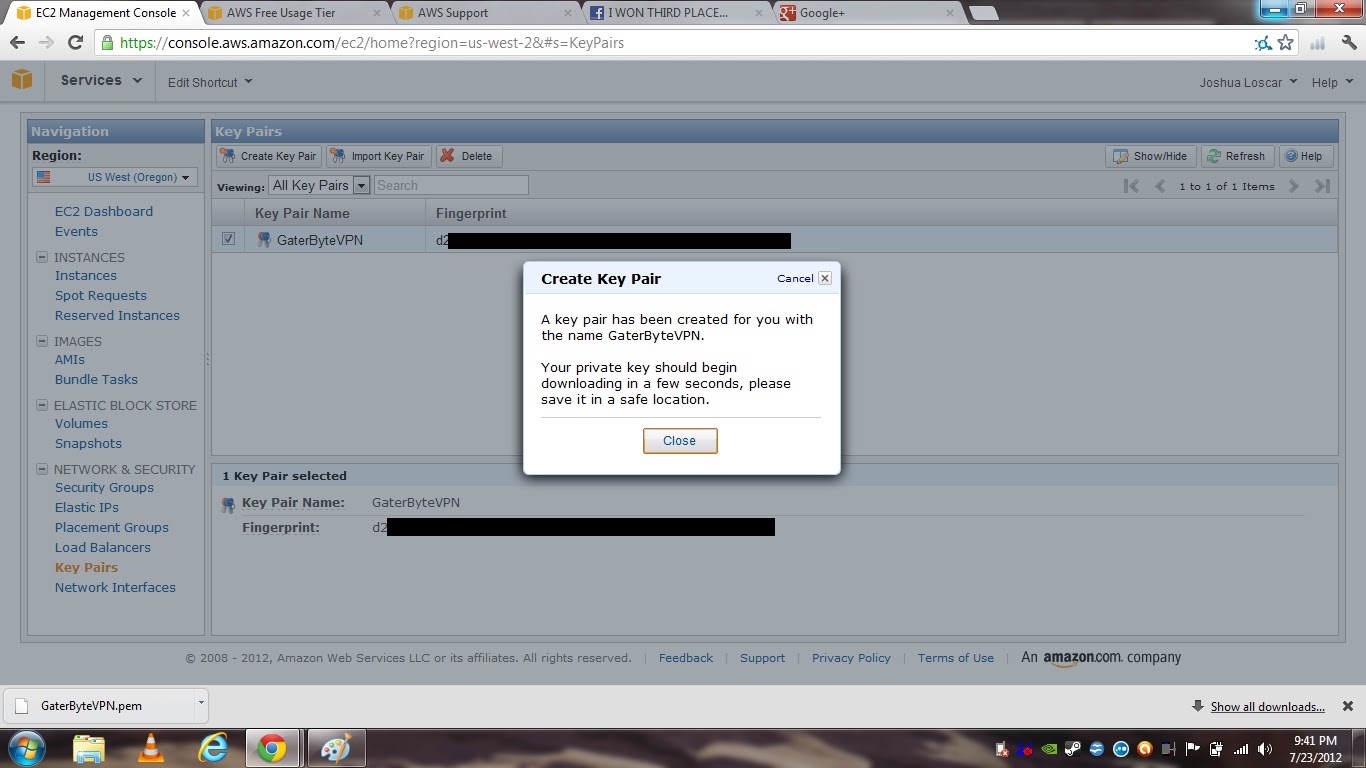
We are going to Create a new key pair, Enter your kaypair name and click the create button

It will then download your private key with a .pem extention, click continue

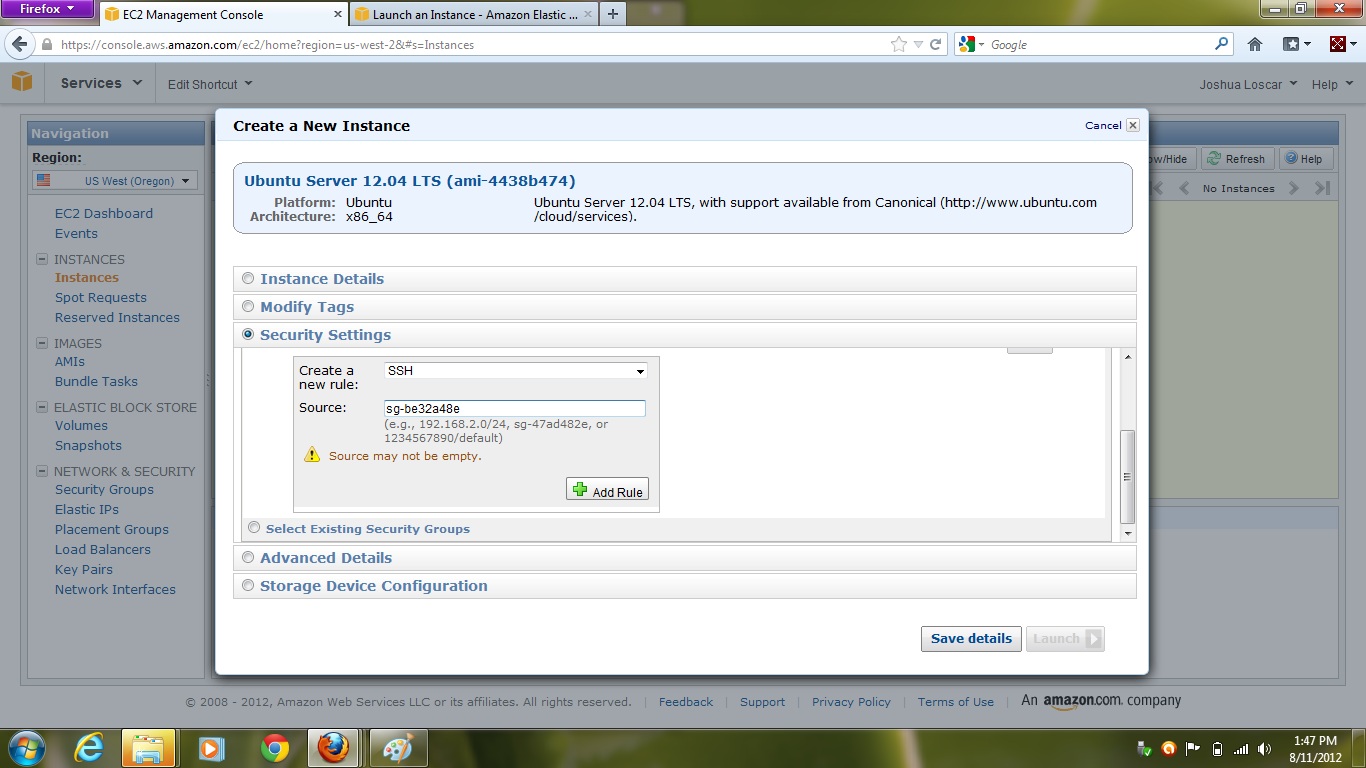
Now it's time to Create a security group, which to Amazon EC2 is the firewall setting ,
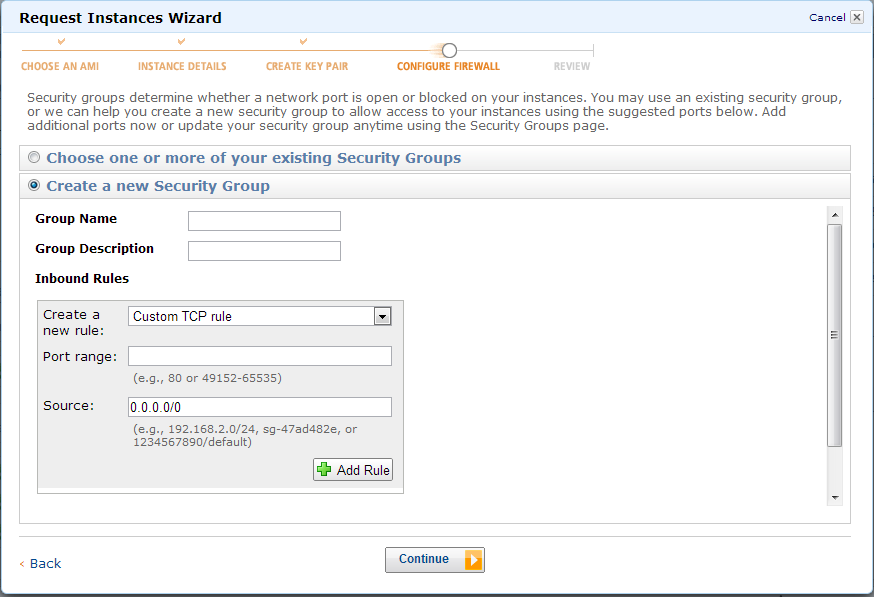
Name your Security group, and then in the inbound rules box, from the drop down menu select All TCP and leave the source box alone, and click add rule (this is so in the future we can add Proxies, If you don't want to do this, skip this step and go to the next one below),

Under the Inbound rules box, click the drop down menu and select the Custom TCP rule, and type 22 in the port range, and click add rule then continue

Now that our firewall is set up, we are finished setting it up, click launch

It will now launch your instance, which can take a few minutes, click close
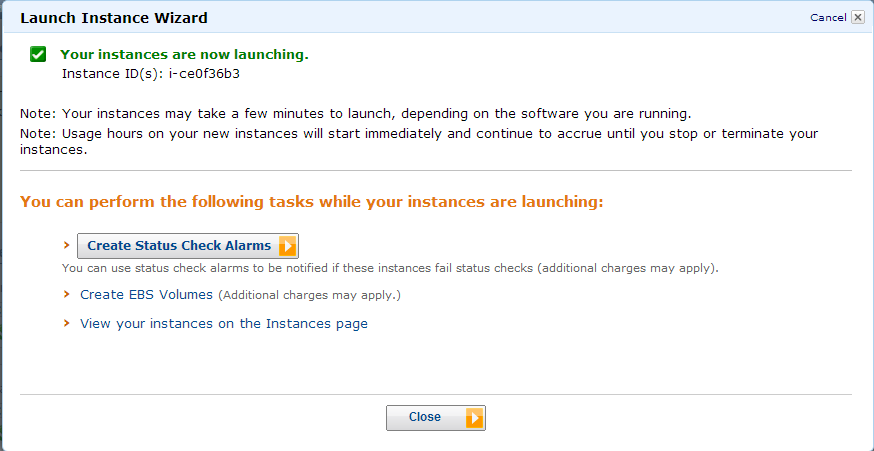
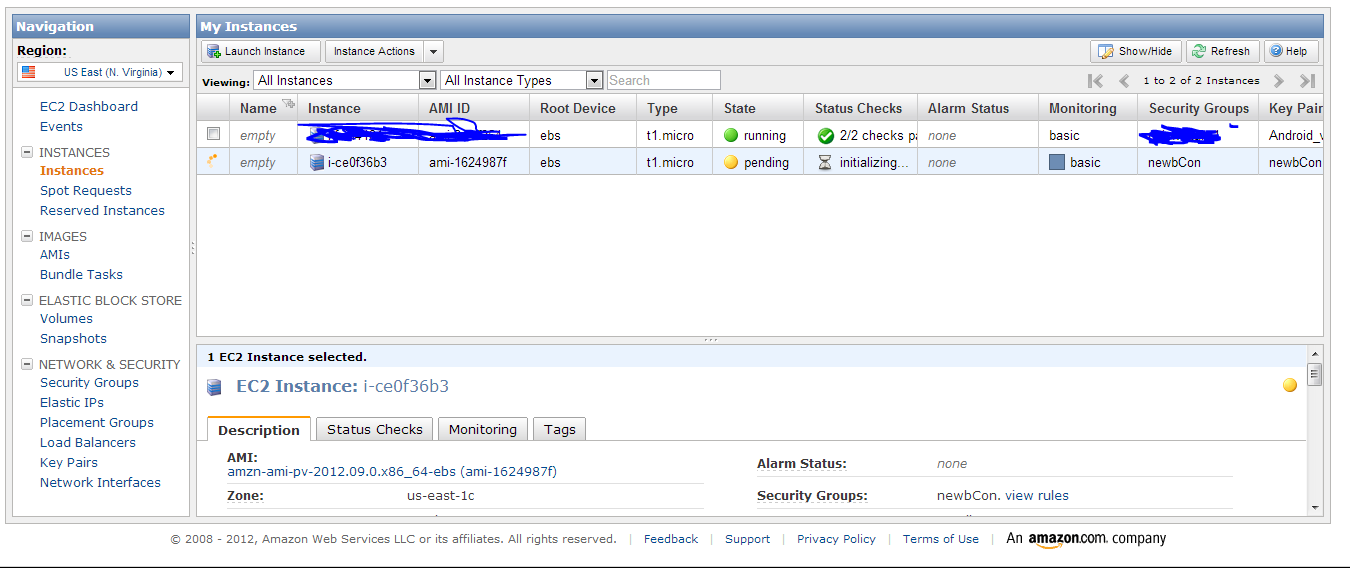
Now you will see this screen, showing that our newbCON server is initializing, now, time to get your Android Device
You now have 2 different options:
#1 Plug your device into the computer
or
#2 If you have an microSD card
Make a folder (i.e. keypair) to save your key to on your android device,
and copy the downloaded private key to it.

Next you will need to right click on your Amazon EC2 and click the connect option, then click the Connect with a standalone SSH Client and in the gray box is the info you need,

take note of everything after the @ sign (this is your host address), you will need to type this into your device in a minute

Back on your device Download, install SSHTunnel from the playstore

Open the App,

Click Hosts,


Click ok, and then click the User option, then type ubuntu, then click ok

check the box that says Use socks Proxy, scroll down on your device

check the box that says Global Proxy,

Then press your menu button, and click the Key File Manager,

Browse to the keypair folder you created, click into it

then click your private key file

then click the Tunnel Switch box,

Wait a minute,

Click Accept,

And if all has gone correctly, it will tell you it has connected in about a minute.

The First one SSH connection i made for myself worked for both my new S3 and Nexus 7, but as i was creating the newbCON SSH on my Nexus 7, it would not connect. I tried rebooting both my Nexus and the Amazon EC2 Server with no luck. So your millage my vary, but it is confirmed working.
I found out about the app and how to set it up on android at a Tech meeting I had on Friday, and i want to thank the person for his help. For now I will not name him, just in case he wants to stay anonymous, but without his help and slides, I wouldn't have know how to do this. Thanks Man!
*Update July 14 2013, I got an email saying my free instance was going to expire at the end of the month. I have not been using it for quite a while, but left it on and running, to see how long it would last. I made it back 10-25-12 and it has gone it 7-29-13.
Sunday, October 14, 2012
Quick Vpn Setup
Here is the video of "Know How" from TWiT on how to set up a VPN.
Download Hamachi
Follow the Instructions on this page and it will get you all set up...
Friday, October 12, 2012
Cloud-based private VPN part 1
I have been working on this for a while now, and it is still not complete This is Part 1 of 2, as soon as I have the last steps in place, I'll post it.
Below is the site I ran across and started updating the instructions here in my blog.
http://www.stratumsecurity.com/2010/12/03/shearing-firesheep-with-the-cloud/
Starting from the Beginning,Below is the site I ran across and started updating the instructions here in my blog.
http://www.stratumsecurity.com/2010/12/03/shearing-firesheep-with-the-cloud/
This is a step by step direction on how I set up my vpn.
I Created an account with Amazon EC2,
Input my Information with my name, mailing address, etc and a credit card number so if i want to upgrade they can charge me.
After you have created an account, click on the "My Account/Console" and select "AWS Managment Console", as seen below.

Then you will come to this page. Click on the "EC2" icon.

That takes you to this page, where on the left hand side, underneath the "Networking & Security" you need to click "Key Pairs".

You will see this page, and need to click on the "Create Key Pair"

Enter the Name of your VPN connection and click "Create"
Then you will see this window with the completed message,
and it will download your key to your download file.
Close the window, then you will see this window.

Click the EC2 Dashboard on the left hand side of the screen, and click the Launch Instance, like the picture below

You will see this screen,

On the Left hand side select "Quick Launch Wizard", Scroll down and select "Ubuntu Server 12.04 LST" and click "continue",

Now you need to set up your "Security Group", you need to click "Edit Details",

This is the screen you will see, click on the "Security Settings" from the selections,

Then Click "Create New Security Group"

In the "Group Name" field, type "InternetAccessible", under the "Description" type "Service Allowed from the Internet", on the drop down menu select "SSH", Click "Add Rule",

Just use the Default setting, Which for me appeared as a drop down menu option, then click add rule,and then scroll up and click create,
Then Click "Save Details"

Next click the "Launch" button.

Then you will see this page telling you that your Instance is now launched. Click the "Close" button.

Now on the left hand side of the screen, Click the "Elastic IPs"
and click the "Allocate New Address" button

Click "Yes, Allocate",

Click "Associate Address" button,

On the Drop down click the name of your Instance, click "Yes,Associate"

Take Note of Your IP as you will be needing it.

You will need to download PuTTY and PuTTYgen to SSH into your Instance,
here is the link to download it.

Amazon has already documented how to SSH into your Ubuntu Instance,
the first link is the directions how to do so in Windows
After you have connected you will see a window Welcoming you to Ubuntu

We need to change that password on the Ubuntu instance,
type sudo su -
hit enter
type passwd ubuntu
hit enter, then type your new password twice

Then we need to change the password for root
type passwd
hit enter, and enter your root password twice,

type exit,
hit enter, then type sudo apt-get update

after that is finished, type sudo apt-get upgrade

update your time zone by typing sudo dpkg-reconfigure tzdata
follow the instructions and use your arrow keys to move to your different options.

It's time to reboot the system, type sudo reboot now
and wait about 2 minutes before tryinng to reconnect to it.
After it had been rebooted,
type sudo apt-get -y install openvpn libssl-dev openssl
Let that install, then type cd /etc/openvpn/
hit enter
type sudo mkdir easy-rsa
hit enter,then type
sudo cp -r /usr/share/doc/openvpn/examples/easy-rsa/2.0/* /etc/openvpn/easy-rsa/
again hit enter, and type
sudo chown -R $USER /etc/openvpn/easy-rsa/
hit enter and type cd /etc/openvpn/easy-rsa/
Make sure to read the termanal, and make sure you have no errors,
In the Picture below, I mistyped a command and it told me the Directory wasn't created,
I found my error and fixed it, and didn't have a problem after that

We now need to set our 'vars' file up and input our SSL certificate information.
We will be using Vi as our editor, if you haven't worked with it before check out this tutorial.
Type sudo vi vars
hit enter

I used my arrow keys to scan down the Vi editor page and found the fields I was looking for.

Here is the list of changes you need to make, you will want to type i to start input mode
Change export ‘KEY_SIZE=1024′ to ‘export KEY_SIZE=2048′
Change export KEY_COUNTRY=”US” to your country.
Change export KEY_PROVINCE=”CA” to your state.
Change export KEY_CITY=”SanFrancisco” to your city.
Change export KEY_ORG=”Fort-Funston” to your organization or something else.
Change export KEY_EMAIL=”me@myhost.mydomain” to your email address.

After you are done inputting your data hit the ESC button on the keyboard,
then type :wq to quit the Vi editor.

I am Finishing up my research and implementation of this
and
I will post the rest of the instructions as soon as I'm done.
and
I will post the rest of the instructions as soon as I'm done.
Subscribe to:
Posts (Atom)